Sunday, May 15, 2011

Not-So-Simple Machines

For the final unit of the school year, we are exploring the fundamental principles of physics - motion and forces.  We did PowerPoint notes on the six types of simple machines, we explored wheels, pulleys and inclined planes in more detail with the K'Nex competition, and now it was time for a culminating project to wrap-up the unit. 

While brainstorming on what to plan for this project, I remembered an activity that we did when I was in elementary school - we read through old Rube Goldberg comics and created machines.  I immediately knew that this was exactly the silly and creative, yet scientific outlet for the students to show me what they understood about simple machines. 

I started at the official Rube Goldberg website and chose some comics that I thought captured the essence of the idea.  Knowing that this could get boring, I also selected some videos that I thought would capture their imaginations and show that Rube's machines were supposed to be overly-complex, but also silly and entertaining.  I chose an old Honda commercial called "The Cog" and the music video for OK Go's "This Too Shall Pass."
I started presenting the videos to the kids with little or no explanation about why we were watching.  Needless to say, at first the kids were a little antsy and wondering why they were watching "The Cog," but within seconds, they were identifying levers and inclined planes in the machine, and pretty soon, one could hear a pin drop...


Once the videos were finished, I explained to them who Rube Goldberg was and the basic premise of his comics - overly-complex machines designed to complete a simple task.  For the project, the students had to design their own overly-complex machine using at least one of each of the six simple machines.  They were immediately excited and brimming with ideas about what to create, but the period was almost over.  For homework, I had them brainstorm five ideas of simple tasks for which they could design a machine. 


Text-Rendered Poems

How can you assess how much students recall from a book while also analyzing language and composing poetry?  Text-rendered poems are a great way to re-explore past events in a story and analyze words for sound and imagery while creating a written composition.

Text-rendered poems are free-verse poems that use single words and phrases from a piece of text as the lines.  They need not rhyme or follow any structure, only that all words are derived from the text and nothing is added by the writer.  The poet's job is to artistically arrange the lines and words into a cohesive and meaningful poem.

I generally use text-rendered poems towards the middle or end of a piece of literature.  I randomly select two-page spreads from the novel and make copies of them onto separate sheets.  I choose as many pages as there are students in the class.  Students then read through their passage and highlight single words or phrases that speak to them, create mental imagery or describe a key aspect of the story.  Once they have highlighted at least ten words and phrases, they may begin composing their poem.

Each phrase or single word is a separate line in the poem.  The student's job is to arrange these lines in such a way that is pleasing and artistic.  Older students can even arrange their lines with meter or pentameter.  My middle school students arrange the lines with variety of length and will sometimes have a specific goal, such as creating an alliterative sequence. 

After the students have finished their poems, I generally have each student share what they have created.  I am frequently surprised by how fluid and poetic these arrangements sound, and the students are often pleasantly surprised by their creation.  The listeners then raise their hands and try to figure out which part of the story is being described.


As an example to model the process, we read a short story from an old book about a dog who had been stranded at sea on a commercial tanker.  The story describes the rescue effort that ensued, the news coverage of the event, the massive donations from the public to save the dog, and finally his warm welcome to the shores of Hawaii.  We projected the article onto the SmartBoard and selected phrases and words to highlight together.  Then we arranged the phrases into a poem on the whiteboard.  Above are images of the poem that we created based on this short story.  

Thursday, May 12, 2011

K'Nex Competition

The year is winding down and I wanted to get some longterm planning done.  I created a calendar for May and June and filled in each block with the lessons that I would cover each day.  Originally, I planned on doing a few general lessons on simple machines, then dedicating the next six school days to a more detailed study of each simple machine: inclined planes, wheels and axles, wedges, screws, pulleys and levers.  Within a few days, this plan was scrapped.

Once we had explored each of the six simple machines, I didn't think the students could bear an in-depth study of each for the next week.  It was boring and I didn't think that they would retain as much as I had hoped.  Before even beginning with the plan, I decided to hold a mini-competition instead. 

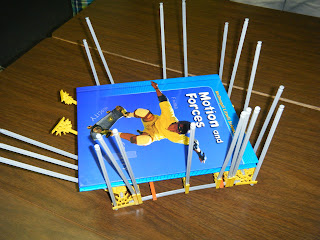
Our science department is fortunate enough to own two giant tubs of K'Nex building materials.  The kits were intended for building a roller coaster, but I wanted something simpler and more focused for our goals.  I broke up our class into two groups and gave each group a task.  One group was responsible for constructing a cart large enough and strong enough for moving the science textbook.  They were given total freedom as far as design because students come with so much background knowledge already about carts, cars and wheels. 

The second group was responsible for constructing a pulley strong enough to lift two metal weights.  I showed the weights to the group so that they were fully aware of the load that their pulley had to carry.  I also gave them a booklet that came from with the K'Nex kit about constructing pulleys.  They were allowed to use the photos in the booklet for reference, but their pulley did not have to follow the directions exactly.  The weight that they had to lift was significantly larger than the weight featured in the photo, so they had to adapt their creation to accommodate more weight.  I was pleased to see that none of the groups copied the model exactly and that they all added features that they thought would increase the machine's efficiency.

The two groups constructed their pieces simultaneously, then we tested the pieces and kept lab data about how much force was needed to pull the loads.  We used a spring scale to measure how much force was required to move the textbook without any machine, then we measured how much force was required to move the textbook with the help of the cart.  In most cases, the students constructed carts that were provided significant mechanical advantage. 

We used the spring scale again to measure how much force was needed to lift the weights with no assistance, then we used the spring scale to measure how much force was needed to pull the rope through the pulley.  Most of the pulleys had only marginal mechanical advantage, but I explained how adding more pulleys can increase the advantage and decrease the amount of effort. 

Once our machines had been tested and we recorded the data into the lab sheets, we disassembled the machines and switched roles.  The cart team was now responsible for constructing a pulley, and the pulley team for a cart.  The new machines were tested and compared to the first round of machines.

Within the parameters that I described, the students, for the most part, worked cooperatively and built machines that met or exceeded my expectations.  Rather than spending two days teaching wheels and axles and pulleys to the students, they experienced the concepts hands-on.


Monday, May 2, 2011

For every action...

...there is an equal and opposite reaction, and for every active lesson, there will be an equal and positive student reaction! 

When teaching Newton's Three Laws of Motion to my sixth graders, it is absolutely essential that we model each principle.  Shortly after seeing these forces in action, students start to realize that much of Newton's philosophy was based on common sense from real-life experiences. 

For Newton's third law, we used several examples to model how forces act in pairs and how these active and reactive forces cause motion. 

After completing quick notes to keep in our science binders, we watched videos and analyzed how these motions from the students' shared experience and knowledge showed Newton's third law in action. 

Our first demonstration was to simply inflate a balloon, then release it and let it zip around the room.  I explained how the contracting sides of the balloon forced out air.  The reactive force propelled the balloon forward, causing it to fly around the room.

Before the lesson, I did a quick search on YouTube and bookmarked some videos of similar active and reactive forces.  I chose to show a jellyfish and a rocket.  After watching the videos and briefing the students on the forces in them, the students recorded their observations in their notes for later reference. 


The culminating activity of this lesson is a lab demonstration.  For the lab, we borrowed scooters from the Physical Education department.  We used masking tape to mark off starting lines for the two scooters, then we demonstrated how force applied from one scooter causes both scooters to move.  The lab is explained in more detail on the lab sheets below. 


This lesson was a success in our classroom, both in terms of student engagement and student understanding.  It helps, however, to have a little extra help with overseeing the students while they setup and demonstrate the scooter portion of the activity!


Calculating Speed - Time Trials

During our unit on Motion, we had to apply the formula for calculating speed.  We did some practice worksheets with this concept, but I wanted to use a more active, kinesthetic approach, as well. 

I decided to take the students out into the hallway and do some time trials.  I didn't want, however, the kids to be racing and comparing times for running.  I was worried that it would either turn into chaos, be hurtful to students with slower times, or both.  They already have fitness testing to make them aware of who can run the fastest, so I decided to something a little sillier...

In the hallway, we created a "racetrack," which was really a measured track with a starting line and a finish line marked on the floor with masking tape.  The start and finish lines were 30 feet apart.

Each student was assigned some movement, and they were allowed to volunteer for each movement so that no one was forced out of their comfort zone.  We had "safe" movements, like walking, running and jogging, for students who were a little more self-conscious, then we had skipping, army crawl, log roll and crabwalking for the more adventurous students.  After each student was assigned a task, we began our trials.

I sat at the finish line with a stop watch and calculated how long it took for each student to go the 30 feet.  We kept chart of the times on a piece of large chart paper that was taped to the wall.  After a few trials, students began to correlate that faster movements took less time.

Finally, we brought the chart paper back into the classroom and each student was responsible for calculating his or her speed in feet per second.  We then charted these results on another sheet of chart paper.  As a final culminating assignment, the students graphed the comparative speeds of each activity onto graphs that they kept in their notebooks. 

It is innately apparent to a middle schooler that running will be faster than a log roll, however, these calculations and graphs gave scientific and quantitative context for that tacit understanding.  The students enjoyed this activity and, best of all, it was appropriate and comfortable for all of the different personalities and sensitivities of the class.